Set up a content space and deliver your first content
Add a content space, give it a schema in Assignments, publish an entry and check what applications receive. Then manage the space: its languages, who may read it, and its own settings.
- Applies to
- Headless CMS 1.0 and later
- Who can do this
- Administrator
- Permission
feature.hcms. space. create - Where
- Headless CMS › Content spaces
On this page
Before you start
- You need the CMS Administrator role, or at least Create on content spaces (
feature.), content schemas (hcms. space. create feature.) and assignments (hcms. schema. create feature.). See Give someone a role.hcms. assignment. create - Decide what the space is for. One space per website, app or audience is usual, for example
companyfor your company website. - To offer more than one language, the languages must first be published as content languages in your Laramin.
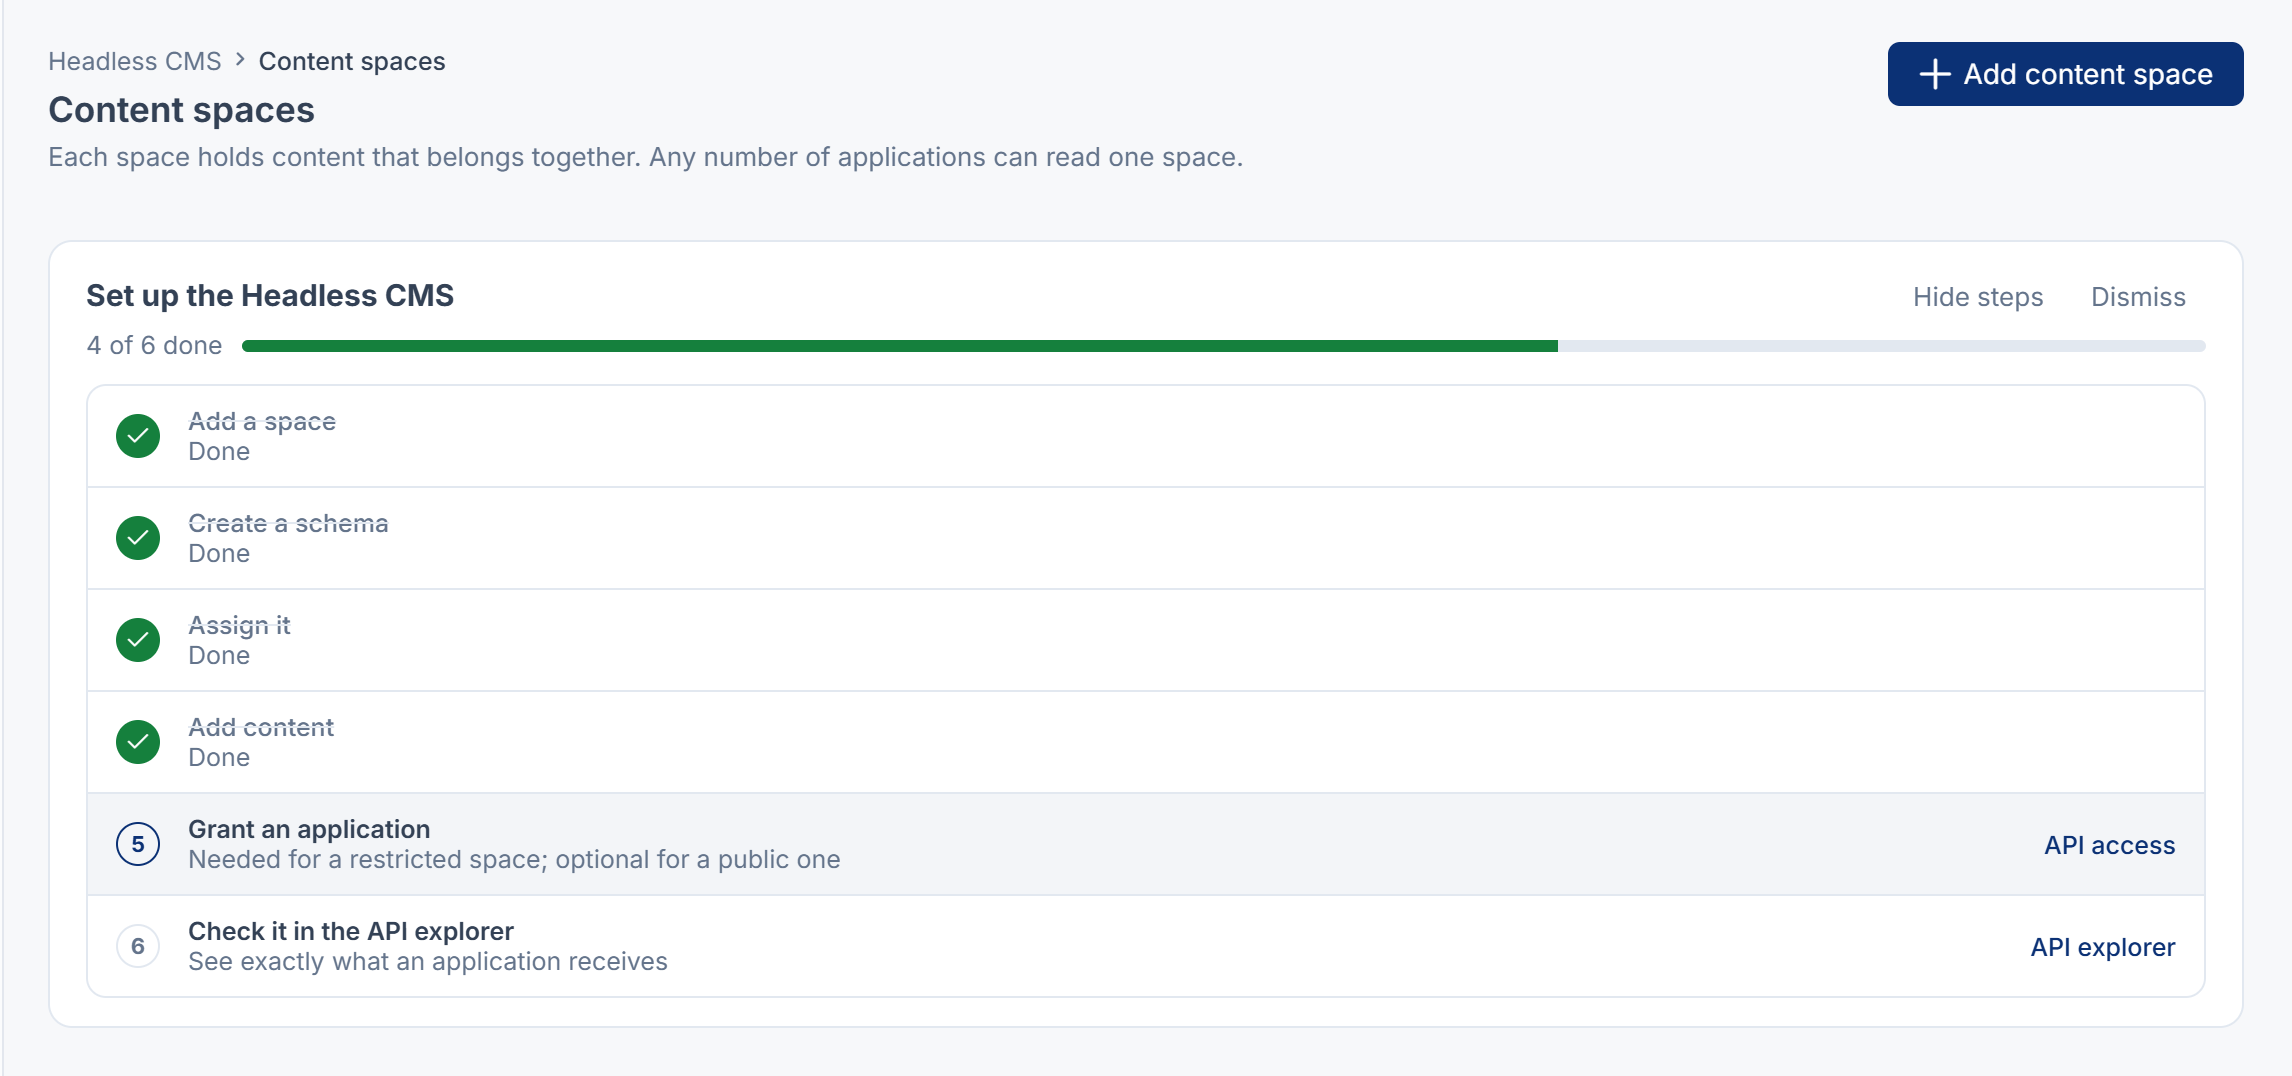
On Content spaces, the Set up the Headless CMS card lists the six steps below and ticks each one when it's done. Select Show steps to open it.
Steps
1. Add the space
-
Open Headless CMS › Content spaces.
-
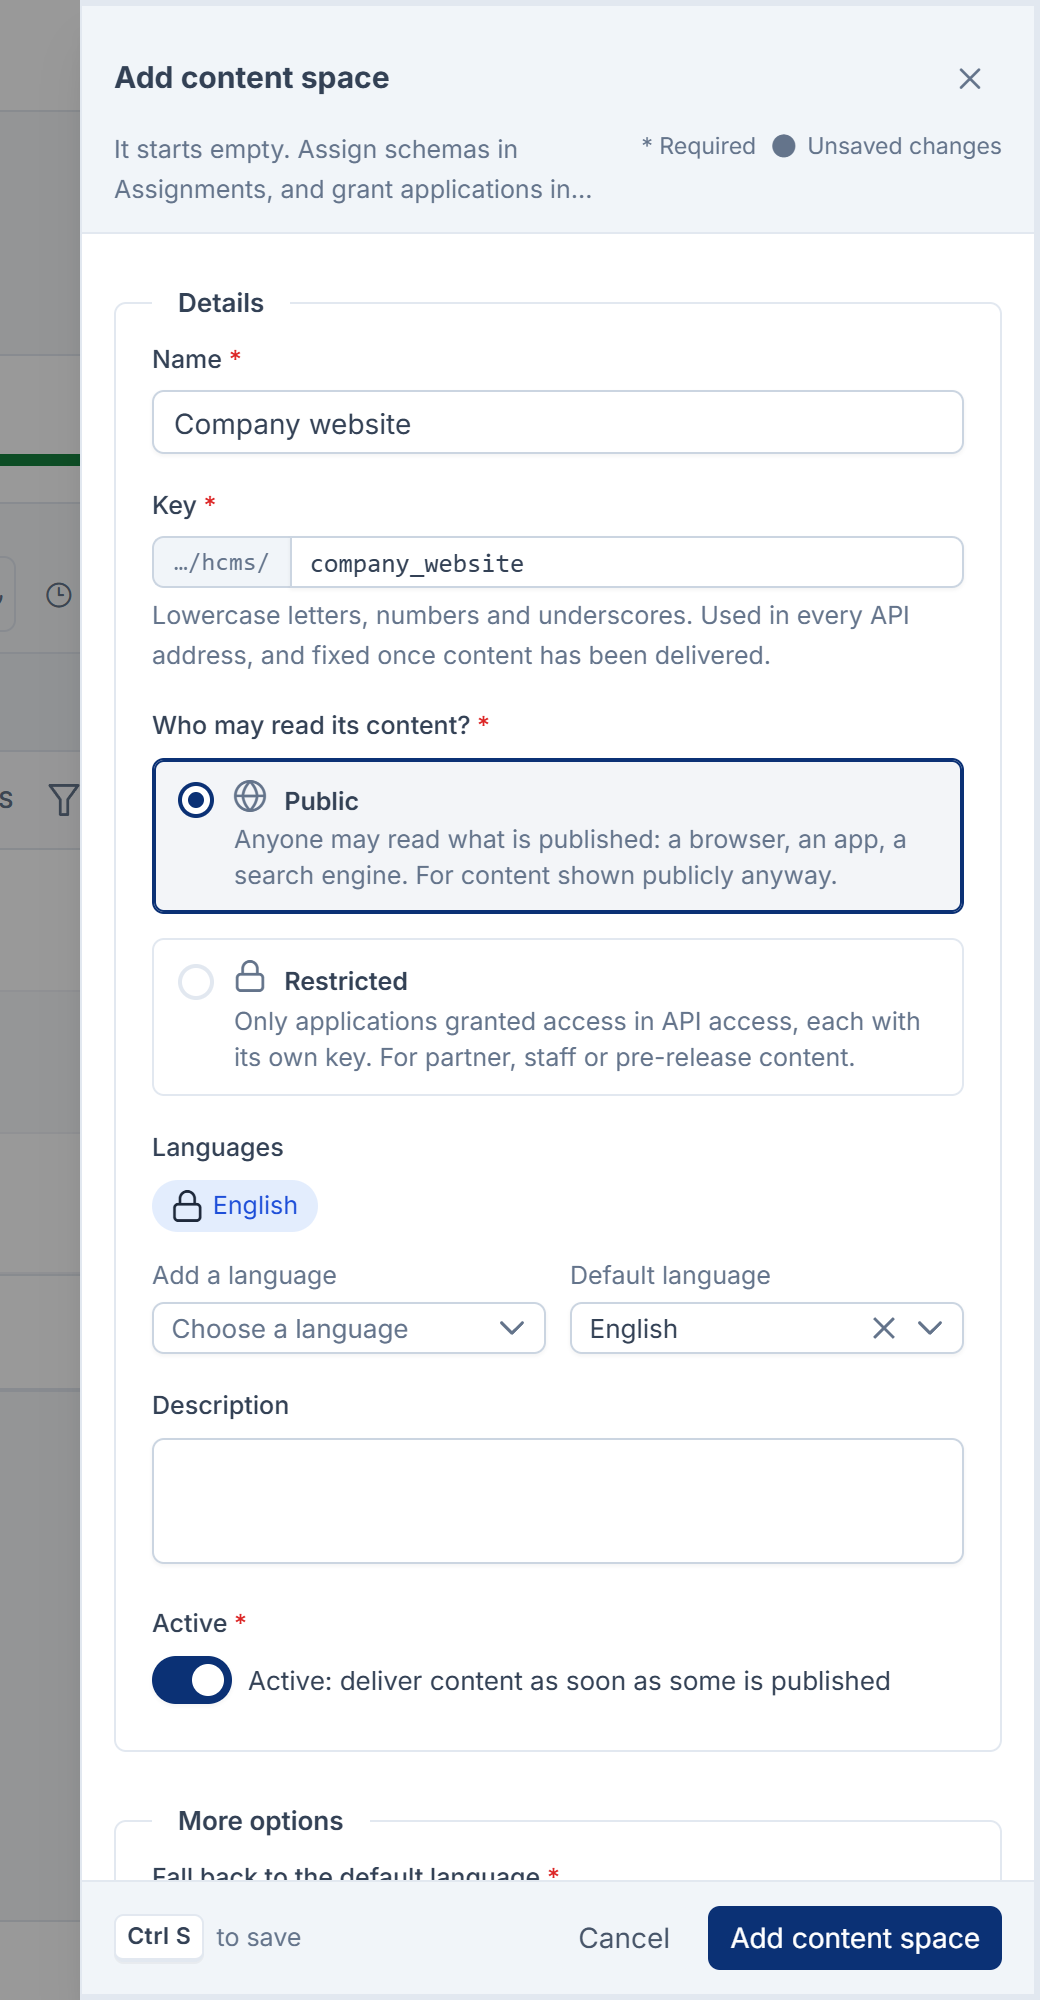
Select Add content space.
-
In Name, type the name editors will see, for example
Company website. -
Check Key. It follows the name, for example
company_website. Applications use it in every address, such as/api/. Use lowercase letters, numbers and underscores, starting with a letter, 2 to 48 characters.v1/ public/ hcms/ company_website/… -
Under Who may read its content?, choose:
- Public: anyone may read what's published, such as a browser, an app or a search engine. Choose it for content that's shown publicly anyway.
- Restricted: only applications you grant in API access, each with its own key. Choose it for partner, staff or pre-release content.
-
Under Languages, add the space's languages and choose its Default language. A request that names no language receives the default.
-
Optional: add a Description, and under More options choose whether Fall back to the default language follows the global setting or is on or off for this space.
-
Leave Active on to deliver content as soon as some is published.
-
Select Save.
Careful: The key can be changed only until a delivered response has named it. After that it's fixed for good, and a key is never given to another space, even after the space is removed.
2. Create a schema
A schema is the shape of one kind of content, such as a site header or a list of FAQs. You can reuse it in any number of spaces.
- Open Headless CMS › Content schemas and select Create schema. Choose a suggestion such as Site header or FAQs to fill in the name and type for you.
- Add its fields.
See Create a content schema and add its fields.
3. Assign the schema to the space
-
Open Headless CMS › Assignments.
-
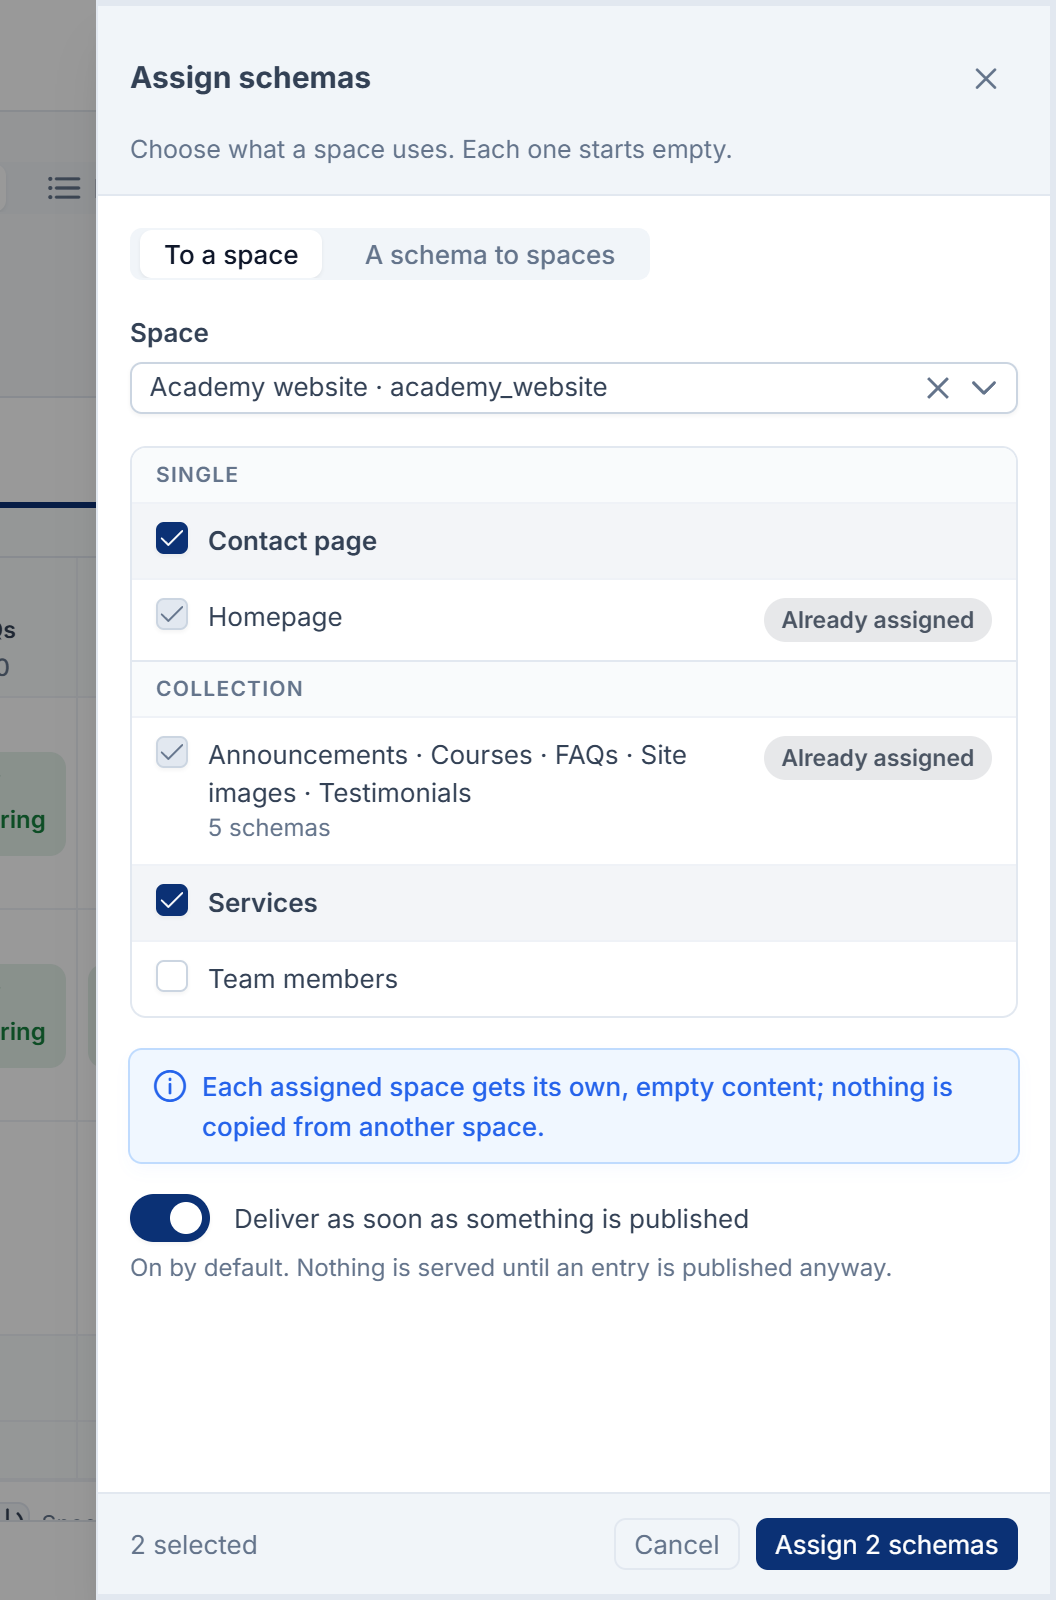
Select Assign.
-
Under Direction, choose To a space, then choose the space.
-
Tick the schemas the space should use. Inactive schemas aren't offered.
-
Leave Deliver as soon as something is published on. Nothing is served until an entry is published anyway.
-
Select Assign.
The space gets its own, empty content for each schema. Nothing is copied from another space. To start from a schema instead, choose A schema to spaces.
4. Add content and publish it
Open Headless CMS › Content, choose the space, fill in an entry and publish it. See Write and publish content.
5. Grant an application (Restricted spaces)
A Restricted space answers only applications you grant, with a key from Core. A Public space needs no grant, but a grant still gives an application a default channel. See Give an application access to a content space.
6. Check it in the API explorer
Open Headless CMS › Delivery › API explorer, choose the space and schema, and select Run. You see exactly what an application receives. See See what an application receives in the API explorer.
Read the Assignments matrix
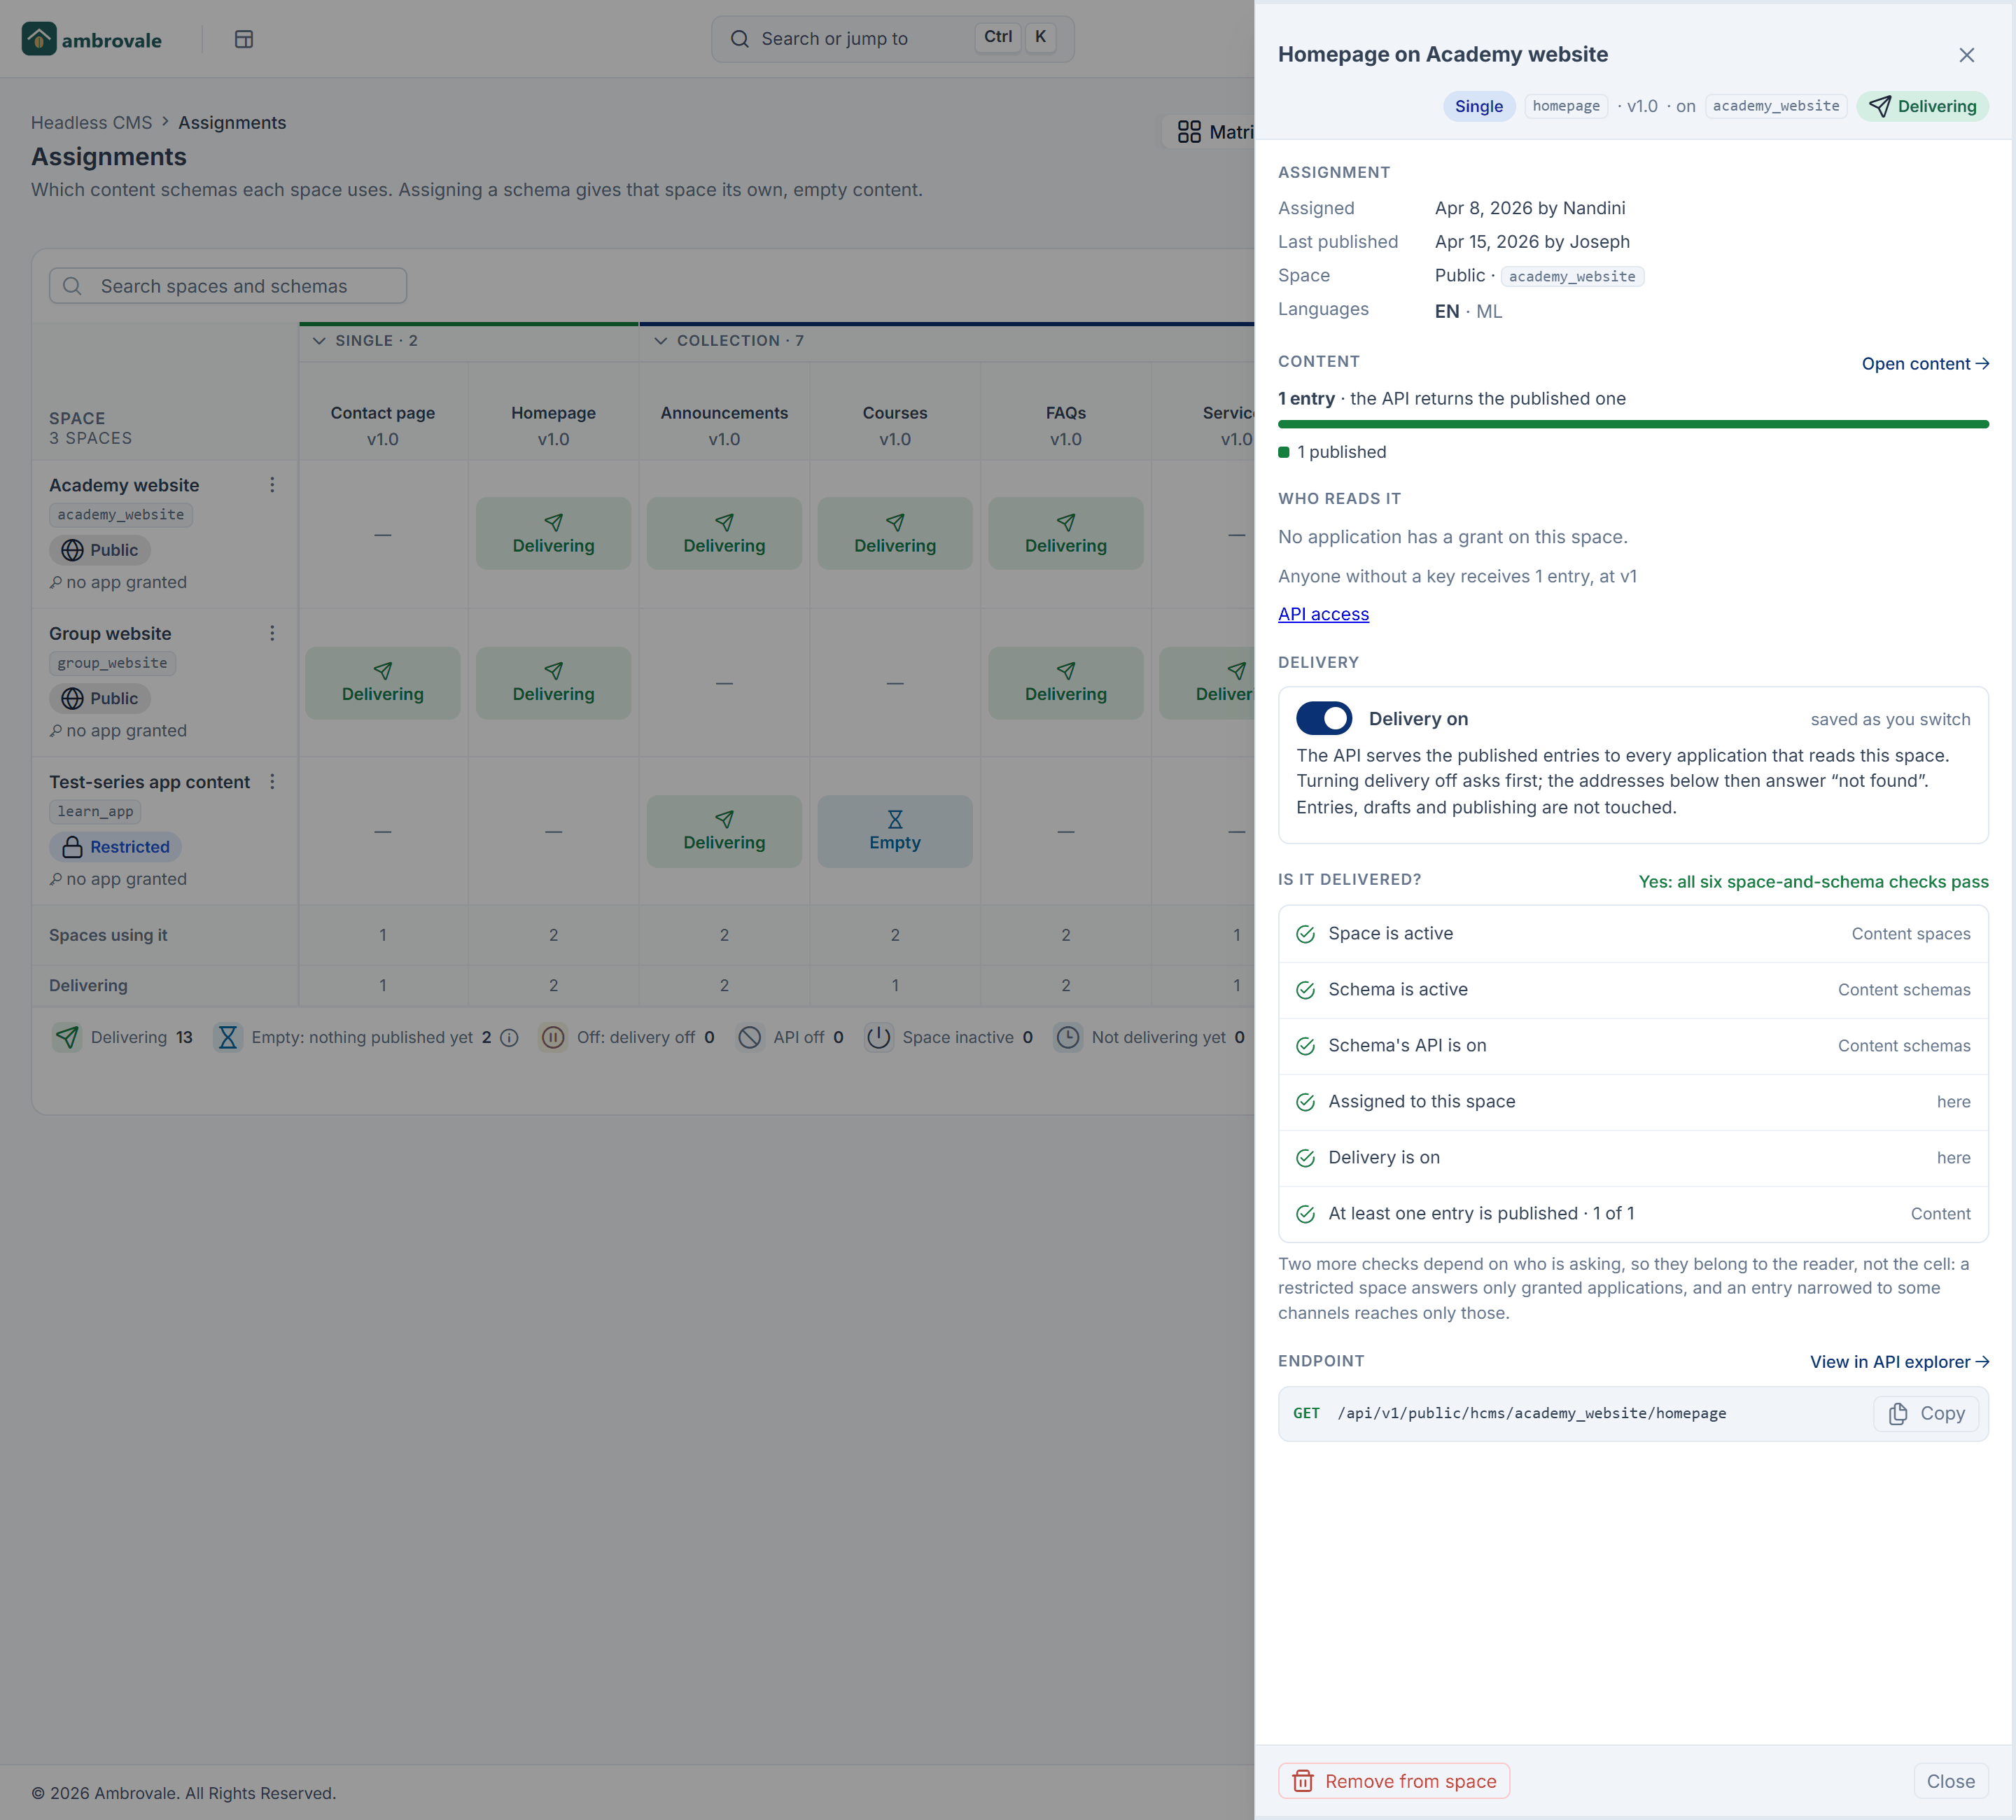
Assignments shows spaces as rows and schemas as columns. Each cell names the first check that stops its pair from delivering:
| Cell | Means |
|---|---|
| Delivering | Applications receive the published entries. |
| Empty | Assigned, but nothing is published yet. |
| Off | Delivery is turned off for this pair. |
| API off | The schema's Delivery through the API is off, everywhere. |
| Space inactive | The space is inactive, so nothing on its row is delivered. |
| Not delivering yet | Nothing from this schema has been published in any space yet. |
| Removed | The schema was removed from the space. Its content is kept. |
| Inactive | The schema is deactivated. |
| An empty cell with a dash | Not assigned. |
Select a cell to open the assignment. Its panel answers Is it delivered?, lists the delivery addresses with Copy the address, and shows Who reads it. Select How delivery works for the eight checks. Use Matrix, List and Removed to switch views, and Export CSV to download the list.
Turn delivery off, remove or restore a schema
In the assignment's panel:
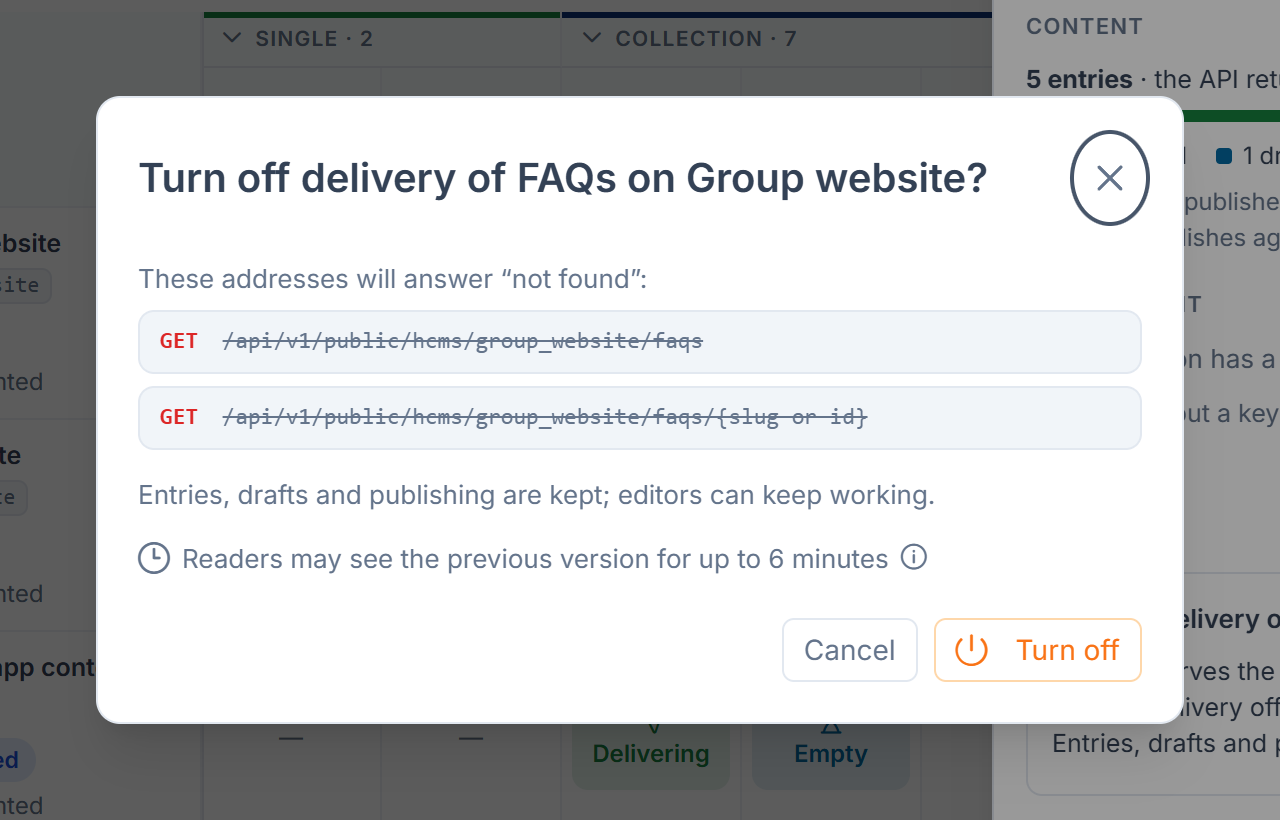
- Delivery on / Delivery off: switches delivery for this space and schema. Turning it off asks first and lists the addresses that will answer "not found". Entries, drafts and publishing are kept, and editors can keep working.
- Remove from space: the schema leaves the space. Its entries are kept, and references to them from other entries read
null. Undo is offered. - Restore, or Restore with delivery off, on the Removed view: brings the schema back with its content. If the schema changed meanwhile, its current fields apply.
- Remove for good: deletes the space's entries for that schema and their publish history. You type the pair, for example
company_website/, to confirm. It can't be undone. Assigning the pair again starts empty.faqs
Change the space later
Open the space from Content spaces. Its page has an Overview and a Settings tab.
- Languages: select Edit languages to add or remove a language or change the default. Removing a language keeps its entries but stops delivering them in it. Changing the default asks first, because every request that names no language then receives the new default.
- Who may read: select Edit. Making a Public space Restricted asks first and lists which applications keep reading it and which are refused, including any website that reads it without a key. Readers may keep seeing the previous answer for up to the space's cache window (6 minutes by default). Undo is offered.
- Deactivate: stops all delivery from the space at once. Nothing is deleted, and content stays editable. Activate delivers the published content again.
- Move to trash: only once no schema is assigned and no application is granted. Remove those first, or deactivate the space instead. A restored space comes back Inactive.
- Settings tab: override a delivery or language setting for this space only. Select Override, enter a value, and save. Reset to global goes back to the global value. Limits, the Undo window and transliteration apply to every space alike and can't be overridden. See Headless CMS settings.
Who reads it on the Overview lists the applications granted this space. Manage them under API access.
What happens next
The space delivers each assigned schema at its own address, /api/, as soon as an entry is published. Give editors the Content Editor or Content Publisher role so they can write and publish. To show the space's content on your public website, choose it under Content space in Choose what your website's home page shows.
Thanks. That helps us decide what to write next.
Thanks for telling us what was missing.
You already answered for this article today. Thanks.
We got a lot of answers from your network just now. Try again in a few minutes.
We couldn't send that. Check your connection and try again.
Links in this article
Printed from help.laramin.in. The online article may have changed since.